Quick Answer
Add this code to your functions.php file. Make sure to replace YOUR-MENU-ITEM-ID with your own menu item ID number.
function add_specific_menu_atts( $atts, $item, $args ) {
  $menu_items = array(YOUR-MENU-ITEM-ID);

  if (in_array($item->ID, $menu_items)) {
    $atts['data-cb-type'] = 'portal';
  }

  return $atts;
}

add_filter( 'nav_menu_link_attributes', 'add_specific_menu_atts', 10, 3 );
Chargebee is a subscription management service that lets you easily take payments for subscription plans you sell on your site. The Chargebee self-service portal allows your customers to login, upgrade their subscription and change their payment information. However, unless you're a WordPress developer it can be tricky to integrate the Chargebee self-service portal with your site as the Chargebee plugin is no longer updated. To get the self-service portal link working in a WordPress header menu, footer menu or widget menu you will need to use a little-known WordPress filter called “Nav Menu Link Attributes” by following the steps below:
1. Find your Chargebee self-serve portal link
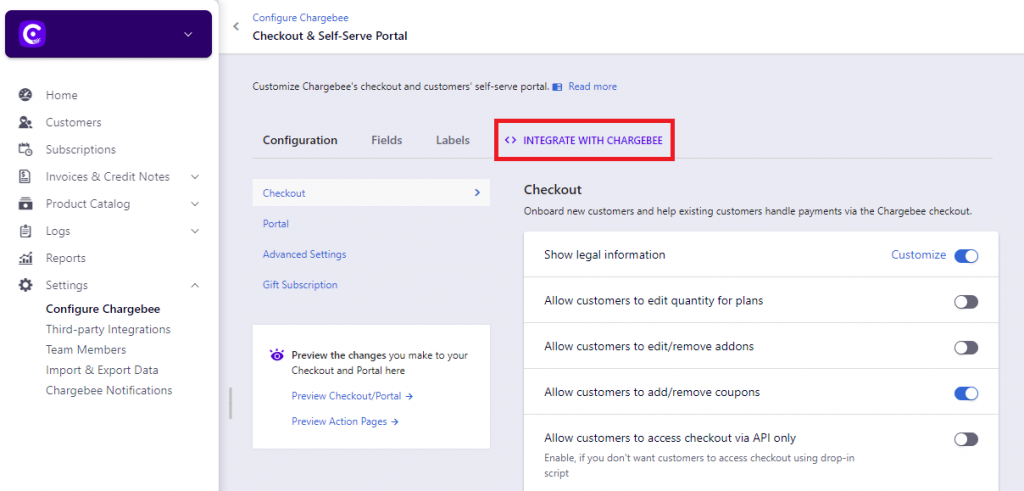 Log in to your Chargebee dashboard at
 https://YOURUSERNAME.chargebee.com/dashboards and head to Settings > Configure Chargebee. Scroll down to the Customer-facing essentials section and click on Checkout & Self-Serve Portal then click on <> INTEGRATE WITH CHARGEBEE.
If you want to set up a normal hypertext link you can just copy and paste the Portal Button Code into your WordPress editor. If you want to add the link to a menu carry on with the steps below.
2. Add the header script to your WordPress theme
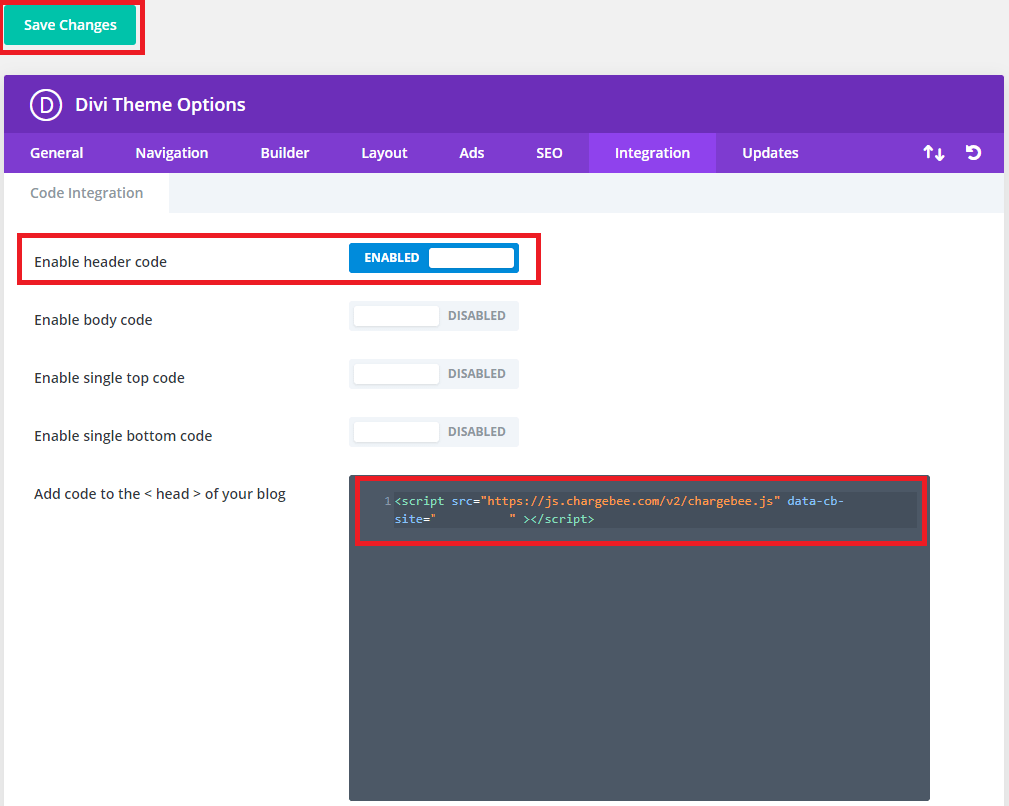 Make sure you have included the correct Header script in your WordPress theme. The test version of Chargebee uses a slightly different script to the live version so make sure you use the correct one when you are ready to go live with your subscription plans.
In Divi you can do this by copying the correct Header script and going to your
 WordPress dashboard > Divi > Theme Options > Integration. Copy the Chargebee Header script into the Add code to the <head> of your blog box, click on the Enable header code switch and then save changes.
3. Create a child theme
In order to add the Chargebee link to a menu you will need to edit the functions.php file in your theme. Before doing this I recommend installing a child theme otherwise any changes to the functions.php file will be lost every time you update your WordPress theme. Follow the instructions from your theme developer or find a WordPress developer to help you:
- Divi - Elegant Themes: https://www.elegantthemes.com/blog/divi-resources/divi-child-theme
- Avada - Themefusion: https://theme-fusion.com/documentation/avada/install-update/avada-child-theme/
- The X - Themeco: https://theme.co/apex/child-themes
- Storefront - WooCommerce: https://docs.woocommerce.com/documentation/themes/storefront/child-themes/
- The7 - Dream-Theme: https://guide.the7.io/user-guide/child-theme/
4. Create the menu item
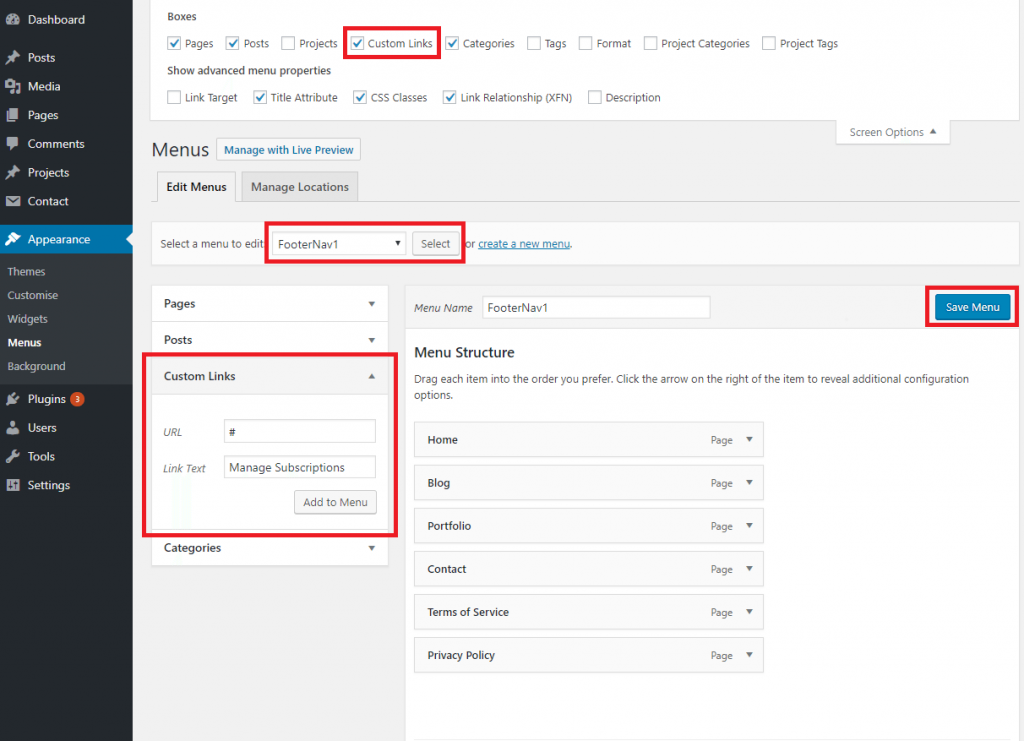 In your WordPress dashboard go to
 Appearance > Menus. Select the menu you want to edit in the dropdown menu and add a Custom Link with the URL set as a hash symbol #, the link text to whatever you want it to be like “Manage Subscriptions”, and then click Add to Menu.
If you can not find the Custom Link section scroll to the top of the page, click Screen Options and make sure there is a tick next to Custom Links.
Don't forget to Save Menu when you are finished.
5. Find the menu item's ID number
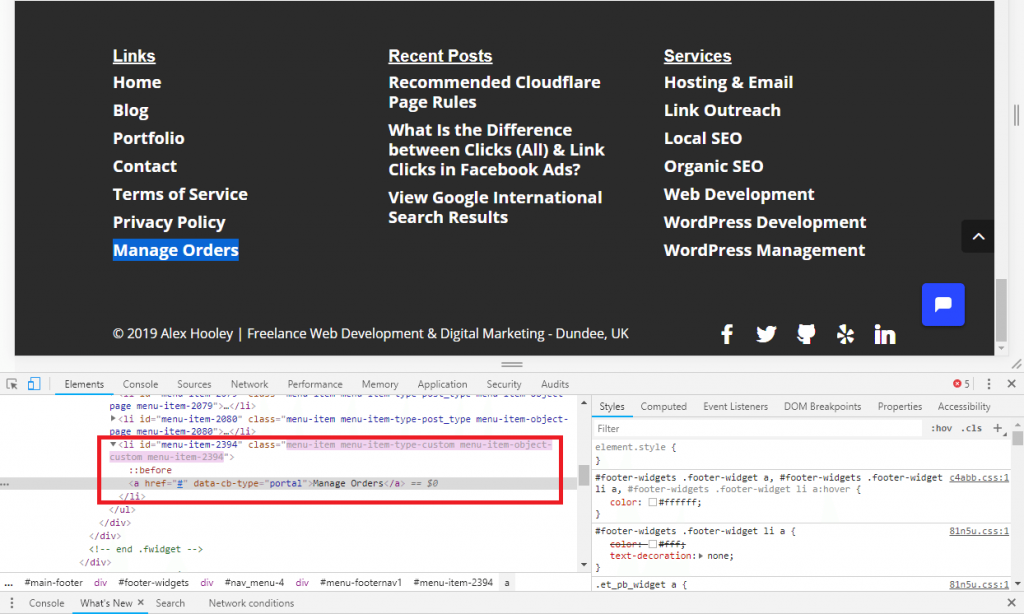 After you've added the link to your menu it should appear live on your site although nothing will happen when you click on it as you need to find the menu item ID number before you can set up the portal link.
Right click on the menu item you just added and click
 Inspect or Inspect Element on the pop-up menu. This will open the developer console on your browser which will show you the ID of the new menu item.
As you can see in the image above my menu item ID is 2394 but yours will be a different number. Write that number down as you will need it for the next step.
6. Add the code to your child theme's functions.php file
For this step you will need to find your functions.php file. You can either do this via your WordPress dashboard or by logging into your hosting or cPanel account and using the file manager.
Head to *wp-content > themes* and open the child theme folder. Create a backup copy of your functions.php file by right clicking on it and selecting “Download”. Once the backup has downloaded right click on the functions.php and click Edit.
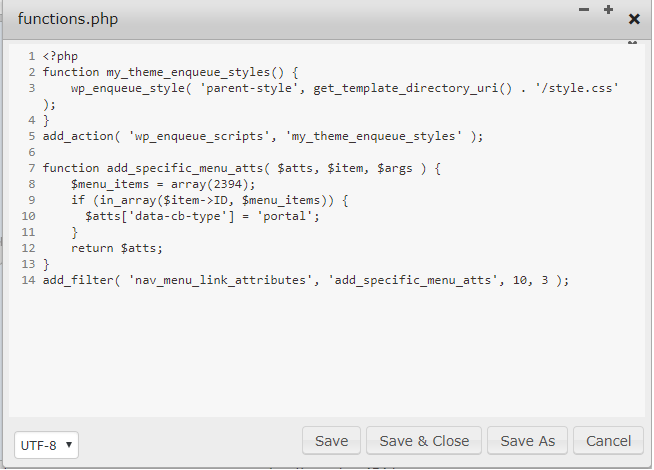
At the very bottom of the functions.php file you need to paste the following piece of code.
**IMPORTANT: Do not forget to replace the YOUR-MENU-ITEM-ID with the number you got from step 5.**
function add_specific_menu_atts( $atts, $item, $args ) {
  $menu_items = array(YOUR-MENU-ITEM-ID);

  if (in_array($item->ID, $menu_items)) {
    $atts['data-cb-type'] = 'portal';
  }

  return $atts;
}

add_filter( 'nav_menu_link_attributes', 'add_specific_menu_atts', 10, 3 );
Now click save and close the functions.php file. Head to your website and now when you click on the new menu item you added it should activate the Chargebee self-serve portal! If it doesn't work double check you have used the correct item ID from step 5. If the code breaks your menu, delete the code you added and try again or use the backup functions.php file you created.
Here is my Divi child theme's functions.php after adding the code:
