
Divi recently disabled the ability to upload WOFF & WOFF2 webfont files in the Divi Builder custom font Drag & Dropload box due to “security reasons”.
Example: I can't upload WOFF / EOT / SVG font files in Divi
New Method to Add WOFF & WOFF2 Fonts to the Divi Builder:
- Convert Your Font Files to WOFF & WOFF2
Using WOFF & WOFF2 together means your font will be almost universally supported by browsers so take your old TTF files and convert them using CloudConvert. - Find the functions.php File & Make a Backup
Locate the functions.php file in your Divi theme folder or Divi child theme folder if you're using one. Download a backup copy of it to your computer just in case! - Add Some Code to Your functions.php File
Copy and paste the following code into your functions.php and save the changes./* Mime Types Support */ add_filter('upload_mimes', 'custom_mime_types', 999999); function custom_mime_types($mimes) { $mimes['otf'] = 'application/x-font-opentype'; $mimes['woff'] = 'application/font-woff'; $mimes['woff2'] = 'application/font-woff2'; return $mimes; } /* Custom Font Types Support */ add_filter('et_pb_supported_font_formats', 'custom_font_formats', 1); function custom_font_formats() { return array('otf', 'woff', 'woff2'); } - Upload the Fonts Together via the Divi Builder
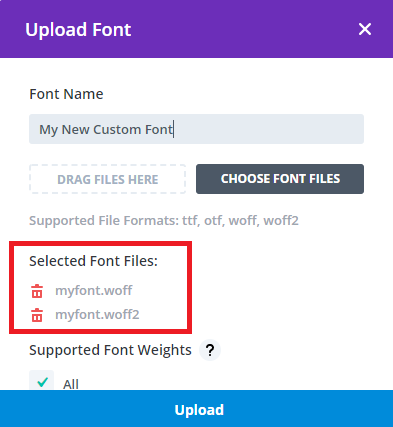
Now go back into the Divi Builder and upload the fonts in the normal way. Make sure you select the WOFF file and the WOFF2 file when you upload them:
 Your WOFF fonts should now be uploaded and working so save and exit the Divi Builder.
 - Go Back & Undo the Changes to the functions.php File If you're all done and the new fonts are working then you can remove the code you copied into the functions.php file in step 3.
Thanks to @lukebussey for writing the code and Nordie for sharing it!
Old Method to Add WOFF & WOFF2 Fonts to the Divi Builder:
- Convert Your Font Files to WOFF & WOFF2 Using WOFF & WOFF2 together means your font will be almost universally supported by browsers so take your old TTF files and convert them using CloudConvert.
- Find the core.php File & Make a Backup Find the core.php file in your website's file system located at:
wp-content/themes/Divi/includes/builder/core.php
and download a backup copy to your computer just in case. 3. Find the Function That is Stopping WOFF & WOFF2 Uploads Open the core.php file and search for this function:
function et_pb_get_supported_font_formats() {
  return apply_filters('et_pb_supported_font_formats', array('ttf', 'otf'));
}
Divi uses this function when uploading new fonts. As you can see it is currently set to only allow OTF and TTF fonts. 4. Temporarily Update the Divi Core to Allow WOFF & WOFF2 Uploads
Add the WOFF and WOFF2 formats to the array and save the file. It should look something like this:
function et_pb_get_supported_font_formats() {
  return apply_filters('et_pb_supported_font_formats', array('ttf', 'otf', 'woff', 'woff2'));
}
- Upload the Fonts Together via the Divi Builder
Now go back into the Divi Builder and upload the fonts in the normal way. Make sure you select the WOFF file and the WOFF2 file when you upload them:
Your WOFF fonts should now be uploaded and working so save and exit the Divi Builder. - Go Back & Undo the Changes to the core.php File
Find the core.php file and remove WOFF and WOFF2 items from the array and save it so it looks like this again:function et_pb_get_supported_font_formats() { return apply_filters('et_pb_supported_font_formats', array('ttf', 'otf')); }